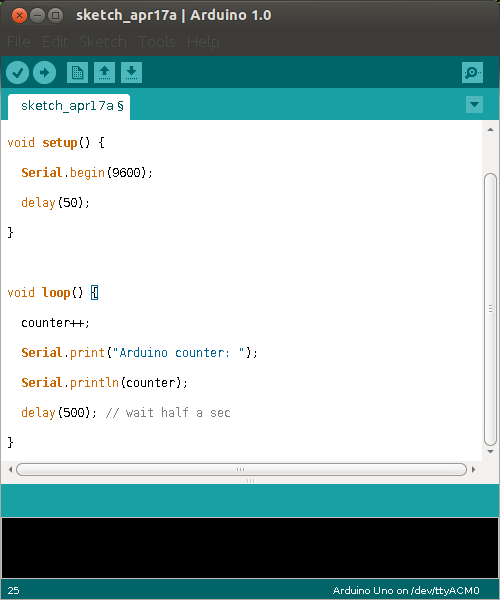
Step 1 : upload demo code to Arduino board 


Arduino demo code

=================

int counter =0;

void setup() {
  Serial.begin(9600);  
  delay(50);
}
 
void loop() {
  counter++;
  Serial.print("Arduino counter: ");
  Serial.println(counter);
  delay(500); // wait half a sec
}

================

sketch_apr17a | Arduino 1.0_004   


* 注意 上傳程式時 , Buletooth 模組先不接 , 否則 Tx Rx pin 可能會衝突

Step 2 : 上傳完成 ,再將藍牙模組接上 ; 重新接上 Arduino board usb cable , 讓arduino 與藍牙模組重新啟動 , 此時藍牙模組燈號會快閃


Step3 : 在 ubuntu 中利用藍牙管理工具 , 將Arduino 藍牙模組完成配對 , 並記下 mac address , 此時藍牙只完成配對 , 尚無法連結 ,  此時藍牙模組燈號會慢閃 .


藍牙_005  


             * 注意: 若在windows環境下, 此時不可開啟 Arduino IDE , 否則會導致 RX TX 衝突 , 藍牙失去效用 . 若失效則 Arduino usb cable 需 replus 來重啟 . Linux 下好像無此問題.


Step4 : 在 ubnutu 上建立藍牙連結並綁到 rfcomm0  device name , 指令如下


jm@hardy:~$ sudo hcitool scan  // 掃瞄藍牙裝置硬體編號 , 也可由上步驟查詢
Scanning ...
00:02:C7:7D:F5:17 BlueGPS 7DF517

jm@hardy:~$ sudo rfcomm bind /dev/rfcomm0 00:02:C7:7D:F5:17 1  // bind device port

jm@hardy:~$ ls -l /dev/rfcomm0
crw-rw---- 1 root dialout 216, 0 2008-12-14 23:15 /dev/rfcomm0

完成連線後 , 此時藍牙模組燈號會恆亮 .


Step5 : 開啟 puttyssh client 或 MiniCom  , connection type : serial  , serial line /dev/rfcomm0 , 確認連線 .


PuTTY Configuration_006  


Step6 : 終端機視窗會開始顯示 Arduino程式 透過藍牙連接 , 所傳送過來的 counter 訊息 .

 -dev-rfcomm0 - PuTTY_007  


=============================================================

補充也可以由步驟四開始 , 改為:

Step4 : 直接將藍牙裝置綁定在 /dev/rfcomm0   device name , 並完成連線 . 藍牙模組燈號會顯示恆亮 .

jm@hardy:~$ sudo rfcomm connect  /dev/rfcomm0  00:13:03:20:04:20
Connected /dev/rfcomm0 to 00:13:03:20:04:20 on channel 1
Press CTRL-C for hangup

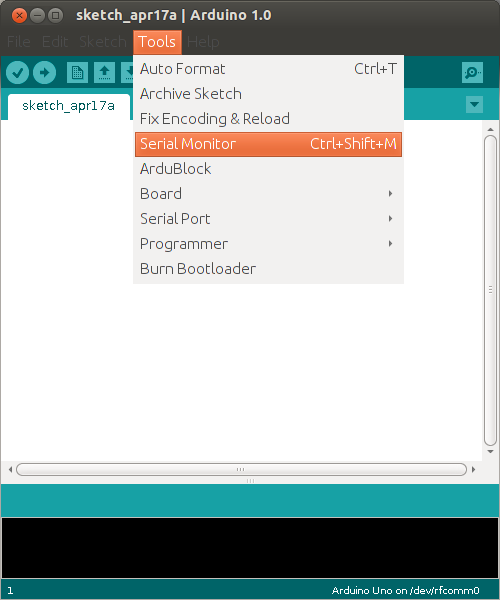
Step5 : 執行 Arduino IDE , tools -> Serial Port 選擇 rfcomm0 .

 sketch_apr17a | Arduino 1.0_011  


Step6 : 開啟 Serial Monitor

sketch_apr17a | Arduino 1.0_012  


Step7 : Serial Monitor 開始顯示 Arduino 程式所傳送出來的 counter 訊息

-dev-rfcomm0_013 


*Windows下 Arduino IDE  Serial monior 選藍牙的  com port 會有問題 , Linux 則不會 .


補充 , 也可上載下面程式 ======================================================


    int iLedPin        = 13;
    void setup(){
      // define the PIN as OUTPUT
      pinMode(iLedPin        ,OUTPUT);
       
      // using baud rate 9600 to listen.
      Serial.begin(9600);
    }
    
    void loop(){
      while (Serial.available()){
        char cCmd = Serial.read();
        if (cCmd =='o'){
          digitalWrite(iLedPin,HIGH);
        }else if (cCmd == 'c'){
          digitalWrite(iLedPin,LOW);
        }
      }
    }

================================

再用putty ssh client 連線到藍牙 serial port

輸入  'o' 可開啟 led13 , 輸入 'c' 則關閉.

文章標籤

puffer 發表在 痞客邦 留言(1) 人氣()

 解決硬碟異音與亮度調整問題

1. 使用軟體中心安裝 laptop-mod-tool 套件

2. 修改 /etc/laptop-mode/laptop-mode.conf 當中

ENABLE_LAPTOP_MODE_TOOLS=1   //   設定使用Laptop 電源管理功能

ENABLE_LAPTOP_MODE_ON_BATTERY=1

ENABLE_LAPTOP_MODE_ON_AC=0


    // 順便解決 HDD 異音 

   # Power management for HD (hdparm -B values)

    BATT_HD_POWERMGMT=250    
    LM_AC_HD_POWERMGMT=254
    NOLM_AC_HD_POWERMGMT=254

3. 修改 /etc/laptop-mode/laptop-mode/conf.d/lcd-brightness.conf

CONTROL_BRIGHTNESS=1
 
BATT_BRIGHTNESS_COMMAND="echo 2"
LM_AC_BRIGHTNESS_COMMAND="echo 2"
NOLM_AC_BRIGHTNESS_COMMAND="echo 2"
#BRIGHTNESS_OUTPUT="/proc/acpi/video/VID/LCD/brightness"
BRIGHTNESS_OUTPUT="/sys/class/backlight/acpi_video0/brightness"

儲存
 
4. 執行命令  sudo update-grub
 
5.Reboot


解除 Laptop-mod-tools 對USB 裝置的干涉
1.編輯   /etc/laptop-mode/conf.d/usb-autosuspend.conf
BATT_SUSPEND_USB=0
LM_AC_SUSPEND_USB=0
NOLM_AC_SUSPEND_USB=0


調整螢幕對比值

1. 安裝 xcalib 套件
2. console 下  xcalib -co 90 -a
(重開機會回復)

監控系統溫度
1. 安裝 Psensor 套件
2. 於啟動應用程式當中勾選

調節 CPU 頻率,溫度與風扇聲
1. 安裝 indicator-cupfreq 套件
2. 於啟動應用程式當中勾選


puffer 發表在 痞客邦 留言(0) 人氣()

在 SAN network的環境裡 , 常常需要透過 san zone 的方式來規劃分配儲存資源 .

這時候就需要知道你的主機 HBA card 的WWN address , 來設定你的 fiber channel switch . 那麼究竟要如何查詢  WWN address 呢.? 

有下列幾種方式 :


方法1: /sys/class/scsi_host/host{n}/device/fc_host:host{n}/port_name File

在Redhat 5 以上 ( 包含 OEL and CentOS) ,   /sys/class/scsi_host/host{n}/device/fc_host:host{n}/port_name 這個檔案裡就包含了 HBA WWN 資訊 .

 n可能代表  0, 1, or 2 是你的系統而定 .

例如 :

$ cat /etc/redhat-release
Red Hat Enterprise Linux Server release 5.3 (Tikanga)

$ cat /sys/class/scsi_host/host1/device/fc_host:host1/port_name
0x2100001c111111c1

方法2: /proc/scsi/{adapter-type}/{n} File

在 Redhat 4 (含)以下 (包括 OEL and CentOS), 在 /proc/scsi/{adapter-type}/{n} file 這個檔案裡就包含了 HBA WWN 資訊 .

其中 {adapter-type} 如果是可能是QLogic HBA卡就表示為  qlaxxxx  , 如果是Emulex
的 HBA 卡 就填入 lpfc .
同樣的 n 可能代表  0, 1, or 2 是你的系統而定 .

以 qlogic 2300 HBA卡 ,在 RedHat 3裡為例 :

$ cat /etc/redhat-release
Enterprise Linux Enterprise Linux AS release 3 (Update 9)

$ cat /proc/scsi/qla2300/1
QLogic PCI to Fibre Channel Host Adapter for QLA2460:
Firmware version: 4.00.23, Driver version 7.07.05
Entry address = f888d060

Request Queue = 0x37280000, Response Queue = 0x37270000
Request Queue count= 512, Response Queue count= 512
Total number of active commands = 2
Total number of interrupts = -1635473967
Total number of active IP commands = 0
Total number of IOCBs (used/max) = (0/0)
Total number of queued commands = 2
Device queue depth = 0x20
Number of free request entries = 454
Number of mailbox timeouts = 0
Number of ISP aborts = 0
Number of loop resyncs = 0
Number of retries for empty slots = 0
Number of reqs in pending_q= 0, retry_q= 0, done_q= 0, scsi_retry_q= 0
Host adapter:loop state= , flags= 0x70013
Dpc flags = 0x0
MBX flags = 0x0
SRB Free Count = 4094
Link down Timeout = 045
Port down retry = 045
Login retry count = 045
Commands retried with dropped frame(s) = 0
Configured data rate: 4 Gb/sec

SCSI Device Information:
scsi-qla0-adapter-node=2000002c222c2cc2;
scsi-qla0-adapter-port=2100002c222c2cc2;
scsi-qla0-target-0=5006016022c22c2c;
scsi-qla0-target-1=5006016822c22c2c;

SCSI LUN Information:
(Id:Lun) * - indicates lun is not registered with the OS.
( 0: 0): Total reqs -877237672, Pending reqs 0, flags 0x0, 0:0:81,
( 0: 1): Total reqs 1074740881, Pending reqs 2, flags 0x0, 0:0:81,
( 0: 2): Total reqs 439861869, Pending reqs 0, flags 0x0, 0:0:81,
( 0: 3): Total reqs 417766757, Pending reqs 0, flags 0x0, 0:0:81,
( 1: 0): Total reqs 1174574, Pending reqs 0, flags 0x0, 0:0:82,
( 1: 1): Total reqs 1906876572, Pending reqs 0, flags 0x0, 0:0:82,
( 1: 2): Total reqs 1175529, Pending reqs 0, flags 0x0, 0:0:82,
( 1: 3): Total reqs 1173331, Pending reqs 0, flags 0x0, 0:0:82,


puffer 發表在 痞客邦 留言(0) 人氣()

當系統開機的過程中 , kerenel 會被先載入到記憶體 ,並控制著整個系統 . 系統一開起來 , 它會在螢幕顯示一連串的訊息 ,
內容是關於開機過程中kernel 所偵測到的硬體資訊 . 而這些訊息會擺在 kernel ring bufer 裡面 , 所謂的 ring buffer 就是當新的資訊進來 , 就會把就資訊覆蓋掉 , 所以稱  ring buffer . 如果你想要在開機之後讀取這些訊息 , 你可以使用 dmesg 指令 . 例如:

 翻頁顯示所有資訊
# dmesg | more
Bluetooth: L2CAP ver 2.8
eth0: no IPv6 routers present
bnx2: eth0 NIC Copper Link is Down
usb 1-5.2: USB disconnect, address 5
bnx2: eth0 NIC Copper Link is Up, 100 Mbps full duplex
....................................
..............................


 查詢可用系統記憶體

# dmesg | grep Memory
Memory: 57703772k/60817408k available (2011k kernel code, 1004928k reserved, 915k data, 208k init)

 檢視網卡狀態資訊 (UP/DOWN)

# dmesg  | grep eth
eth0: Broadcom NetXtreme II BCM5709 1000Base-T (C0) PCI Express found at mem 96000000, IRQ 169, node addr e4:1f:13:62:ff:58
eth1: Broadcom NetXtreme II BCM5709 1000Base-T (C0) PCI Express found at mem 98000000, IRQ 114, node addr e4:1f:13:62:ff:5a
eth0: Link up


Linux 可允許你改變內定的 ring buffer 儲存檔案的大小限制 , 只要改變 CONFIG_LOG_BUF_SHIFT 這個參數的值 .  一般 dmesg buffer 會儲存在類似這樣的檔/boot/config-2.6.18-194.el5
 , 視你的系統版本而定 .因此你可以用下面一行指令 ,尋找與改變該參數的值 .

#  grep CONFIG_LOG_BUF_SHIFT  /boot/config-`uname -r`
CONFIG_LOG_BUF_SHIFT=18

清除 dmesg Buffer

如果你想要在下次開機前 , 先清除 dmesg buffer , 你可以執行下面指令:

# dmesg -c

# dmesg

dmesg 時間標籤 (timestamp)

原則上  dmesg 是不會伴隨顯示時間標籤的 , 然而 linux 有提供以看見開機的每一行訊息的時間標籤的方法 ,

將 klogd service 啟用並設定紀錄訊息於  /var/log/kern.log  檔案裡 . dmesg 的訊息就會帶上時間標籤了.


# dmesg | grep "L2 cache"
[ 0.014681] CPU: L2 cache: 2048K

# grep "L2 cache" kern.log.1
Oct 18 23:55:40 ubuntu kernel: [ 0.014681] CPU: L2 cache: 2048K


puffer 發表在 痞客邦 留言(0) 人氣()

EMC PowerPath 系統管理

假使你的主機具有兩片 HBA 卡 , 連接到 EMC SAN storgae 設備上 , 再透過 EMC PowerPath 軟體 , 就來可以建置負載平衡(load-balancing)與 故障復原 (fail over) 的高可用性系統.


Powermt這個管理工具 ,就是用來輔助管理EMC儲存設備的多多路徑存取功能的 .在這篇文章裡 , 我們會討論這個指令要如何來應用 .

puffer 發表在 痞客邦 留言(0) 人氣()

探討Linux/proc檔案系統/proc directories,/proc files)


linux 檔案系統下 /proc 這個目錄,我們可以看到兩種類型的內容 -

一種是數字編號的目錄 , 另一種是與系統資訊相關的檔案 .


事實上 /proc 不不是一個實體的檔案系統而是虛擬的 . 其明顯例子就是當你

執行 # ls -l /proc/stat 指令時 , 你會注意到它顯示的檔案大小是 0 bytes , 但是你執行 #cat /proc/stat , 你卻可以看到這個檔案的內容 .


而有幾個 linux 的系統指令輸出結果 , 事實上它就是從 /proc 讀取資訊 ,

然後以某種格式呈現出來的 .


1.先來說說第一種依數字編號的目錄

當你執行 # ls -l /proc , 你會看到很多以數字為名的目錄 , 這些數字實際代表的是系統正運行的 process ids , 也就是程序編號 , 而相對應的目錄裡

所存放的檔案也就對應為該 PID 的程序所有.


下面列出的就是每個程序對應編號目錄裡所包含的重要檔案:


  •  
    • cmdline – command line of the command. 指令列

    • environ – environment variables.

      環境參數

    • fd – Contains the file descriptors which is linked to the appropriate files.

      連結到特定檔案的描述資訊

    • limits – Contains the information about the specific limits to the process.

      程序的特別限制資訊

    • mounts – mount related information

      掛載資訊

而其中所包含的重要連結有:

  • cwd – Link to current working directory of the process. 程序目前所在工作目錄

  • exe – Link to executable of the process. 程序的執行檔連結

  • root – Link to the root directory of the process. 根目錄的連結


2. 第二種就是 /proc 底下關於系統資訊的檔案, 例如:


  • /proc/cpuinfo – 關於 CPU的資訊

  • /proc/meminfo – 關於記憶體的資訊

  • /proc/loadvg – 附載資訊

  • /proc/partitions – 磁碟分割狀態資訊

  • /proc/version – linux 版本資訊


因此linux 某些系統檔案 ,就從/proc目錄底下讀取所需資訊,然後顯示出來,

例如 free 這個指令 , 它會從 /proc/meminfo 檔案讀出資訊 , 然後有格式的顯示出來 .


想了解更多個別 /proc 底下檔案所代表的含意,可以執行 'man 5 FILENAME'


puffer 發表在 痞客邦 留言(0) 人氣()

星期五晚上 , 與車友約在愛河一帶騎攀攀 , 結果遇到了一位相當令人意外的隱藏人物 .


31.JPG


他路過遠遠聽到攀岩車特有的尖銳煞車聲 , 就跑過來在旁邊觀看  , 後來就閒聊起來 .

他說在 Inspired 上班 ,同行車友還傻傻問他認不認識 Danny Mac  ,他說他就是 danny 的老闆  ,
遇到他真是讓人有點驚訝, 原來他叫 Dave Cleaver , 也就是發明24吋街攀的 Inspired 公司創辦人,

後來也也借用 Frank的車 ,牛刀小試一番,
雖然貴為老闆 , 但是還是多少有一點攀岩車底 ,

同行車友有剛好也有騎 echo , adamant 24 bike , 白目的邀他試車 , 結果他很有禮貌的婉拒了. 科科科...

puffer 發表在 痞客邦 留言(0) 人氣()

Jeff Lenosky (April 19, 1971)是一位著名的世界級 freeride與trial 車手 , 得過兩次北美攀岩車冠軍 , 也是登山車豚跳與跳高的紀錄保持者; 2009 Ray's Oddball MTB/BMX 比賽亞軍 . 他習慣騎正規正矩的全尺寸登山車所做的 . 他經常全世界參加比賽與表演 , 也是 Gaint 的讚助車手 , 著名的 STP 街道車就是由他所協助設計的 .


puffer 發表在 痞客邦 留言(0) 人氣()

這是 Inspired bike 贊助車手  Ali Clarkson 所拍的影片 , 片中所騎的車並沒有裝煞車 , 但卻可騎出街攀風 , 簡直是怪物  .

以下是他所騎車子的規格:

- Inspired Prototype 26" frame
- Inspired Fourplay fork
- Inspired riser bars
- Trialtech 90mm stem
- Trialtech cranks
- Trailtech BB
- Inspired freewheel
- Inspired bashring
- Inspired Pivotal seat and post
- Inspired platform pedals
- Trialtech headset
- Trialtech front and rear hubs
- 26inch Trialtech rims
- Maxxis Larsen TT Tyres
- No brakes!


puffer 發表在 痞客邦 留言(0) 人氣()

BikeRadar Live 活動 , 是英國一年一度的單車盛會 , 會中會有來自世界各地單車各領域的好手來參加 ,過程中會有相當精彩的表演與技術交流 . 2010年度的活動預計在七月10,11 , 在 肯特郡的 Brands Hatch 這個地方舉行.

下面是該活動宣傳影片 , 當中表演的車手叫 Martyn Ashton (http://en.wikipedia.org/wiki/Martyn_Ashton) , 是相當著名的攀岩車明星 . 他的英勇戰績 :

Awarded Mountain Biking UK 'Hall of Fame' entry 2008
Front man for 'The Bike Tour' since 2002
World Expert Biketrial Champion
4 X British Biketrial Champion
High Jump World Record Holder   ( Trial bike 側跳高紀錄保持人  尼...)

片中他以一台碳纖的公路車, 騎出攀岩車與街道的風格 , 看他輕鬆自如 , 不要就以為這很簡單 , 完全是車手爐火純青的技術 , 所造成的錯覺 , 千萬不要輕易嘗試用你自己的公路車練習這樣的招式 , 一般人不可能有這樣落下輕易化解撞擊力道的技巧 , 車子肯定像摺紙一樣....


puffer 發表在 痞客邦 留言(0) 人氣()

1 2